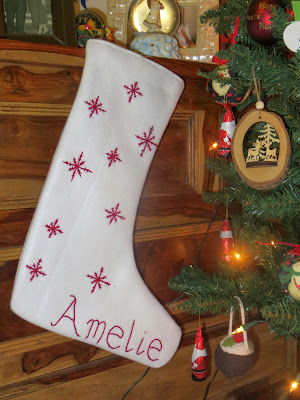
It's my little girl's first Christmas this year so I wanted to make her a personalised Christmas stocking. Unfortunately between working full-time in the museum, doing mummy stuff and running my shop I didn't have as much time I would have liked to make Amelie's stocking so it had to be sweet and simple.
I decided to go for a classic snowflake design and freestyled all of the embroidery. My sewing machine is having a few problems so I had to end up stitching everything by hand which took a LOT longer.
I'm quite pleased with my efforts although I would have liked to do a more intricate design if I had the time but hey there's always next year!
Here's the results...
What you need...
Felt (I used a pre-cut Christmas pack of felt from John Lewis available in white or red for £6.99)
Embroidery Thread in contrasting colour
Sewing thread ( colour should match the colour of your felt)
Embroidery hoop
Water soluble transfer pen/pencil
Greaseproof Paper
Dressmaking Pins
Embroidery needle
Sewing needle
Scissors
Sewing Machine (optional but not necessary)
What to do next...
1. Draw a stocking shape onto the greaseproof paper and cut out.
2. Attach the stocking shape to the felt using pins and draw around the it with the transfer pen. Now draw out the design for your embroidery onto your stocking, being careful to leave a couple of centimetres around the edge for seam allowance. Note: I found it easier not to cut out the stocking shape immediately to make embroidering a little easier to manage.
3. Now begin embroidering your chosen design. I found that I had to use all 6 strands of the embroidery floss so that my design was noticeable against the felt but you can use different thicknesses if your design is more delicate or detailed. I used a small embroidery hoop and moved it around as I worked through the design. All of my stitching was completed using split stitch because I find it to be much neater for straight lines.
4. When you are happy with all of your embroidery use a damp cotton bud to clean any areas of transfer pen still visible. Now place another piece of felt exactly the same size underneath your existing design, pin both pieces together. This is to make sure that you end up with two stocking shapes. Cut out your stocking.
5. Take the two shapes and place on top of one another with the finished design facing inside. Now stitch the two pieces together leaving a small seam around the edge. Don't forget to leave the top part open! You can use a sewing machine or stitch by hand. When you're finished turn the design to the outside. Voila! one easy peasy stocking.
Some added extras...
For a better finish you can hem the top part of the stocking by folding the opening inside and pinning. Stich around the top leaving a small seam.


No comments:
Post a Comment